.svg)
Discover how to integrate your SIS with Blackboard Learn through School Passport.
 |
Blackboard Learn provides educators with the autonomy to deliver the inclusive, consistent educational experiences learners desire, all while reliably operating alongside your current tools and integrations. |
In this article
Blackboard Learn setup in School Passport
Step 1. Activation Blackboard Learn app in School Passport
Step 5. Completing configuration
Registering REST Integration in Blackboard Learn
Obtaining DSK in Blackboard Learn
General information
|
Application name |
Blackboard Learn |
|
View in Application Gallery |
|
|
Vendor company name |
Anthology |
|
Vendor`s website |
|
|
Integration type |
Import, 2-Way Sync |
|
Supported Data Schema |
REST API |
|
Help |
Onboarding process
The GG4L Onboarding Process for the Blackboard Learn Integration consists of the following steps:
1. Onboarding initiation
Firstly, you need to fill in and submit the form. Once the form is submitted, GG4L will offer you an Introductory meeting to talk about all the integration details and help you with onboarding.
2. Roster Data integration
Upon submission of the form, you will receive SIS Data Integration instructions within 24 hours. These instructions guide you on how to set up the data sharing integration between your Student Information System (SIS) and the School Passport. Prior to initiating data sharing, please review the Data Requirements carefully.
Once the data is synced, we will validate and check the data quality before its sharing. If any details need clarification, a GG4L Customer Support Representative will contact you.
3. Activation and configuration of the Blackboard Learn app
Once the data is successfully imported to School Passport, you will receive activation and configuration instructions for the Blackboard Learn app.Blackboard Learn setup in School Passport
Integrating your SIS with Blackboard Learn involves three steps. The first step involves making Blackboard Learn available within the School Passport. The second step focuses on delivering data, while the third step completes the necessary settings.
Step 1. Activation Blackboard Learn app in School Passport
- Log in to School Passport as District Admin and click Connect.
- Navigate to the Application Gallery and find the Blackboard Learn app. Alternatively, use a direct link.
- Click Activate.
Step 2. Sync mode
When configuring a Blackboard Learn app, the initial step is to choose the Sync Mode. It is recommended to review the available sync modes and select the appropriate one.

| Name | Description | Integration type |
| Import | Import roster and gradebook data from Blackboard Learn to School Passport, enabling seamless data transfer. | Use Blackboard Learn as a data source |
|
2-Way Sync (Recommended) |
Enable bidirectional sync between the data source (SIS) and Blackboard Learn. Changes made in either system are synchronized, including creating and updating items. This mode is recommended for seamless data synchronization and integration between the platforms. | Bidirectional rostering and Grade Sync between your SIS and Blackboard Learn |
Step 3. Delivery Config
In the Delivery Config, enter API credentials accurately to establish a connection between your Blackboard instance and the School Passport. Once completed, click Next.

- Service Base URL: Enter the URL of the district's Blackboard instance. It serves as the connection point between the district's Blackboard instance and the Application you are currently configuring in School Passport. For example,
https://blackboard.exampledomain.com. - Application ID: Upon the application creation, the unique Application ID is generated. Copy the Application ID and use it to register a REST Integration in Blackboard Learn.
- Data Source Key (DSK): Retrieve a DSK from your Blackboard instance and enter it in this field. A DSK serves as a unique identifier used to connect external data sources with Blackboard. If you begin to use a new data source, update this value accordingly. Changing the DSK will lead to associating current data with a new DSK.
- Test Connection: Click to verify that the remote connection is configured correctly and established a connection to the server.
Step 4. Schools Mapping
The Schools Mapping, provides a comprehensive overview of Blackboard's organizational hierarchy, making it easy for District Admins to map out the entire structure.
Important:
To perform mapping, corresponding organizations (nodes) must be already created in the Blackboard environment, and have similar names to those imported from the district's SIS.
- On the Map GG4L schools to, choose the schools mapping mode you wish to use. This mode will determine how your data will be associated:

- Blackboard root: Associate schools, users, and course data directly to the main Blackboard structure, providing centralized management and navigation.
- Blackboard node: Associate users, and course data with specific nodes or schools within the Blackboard structure, allowing distributed management and configuration flexibility.
- Configure the schools mapping itself.
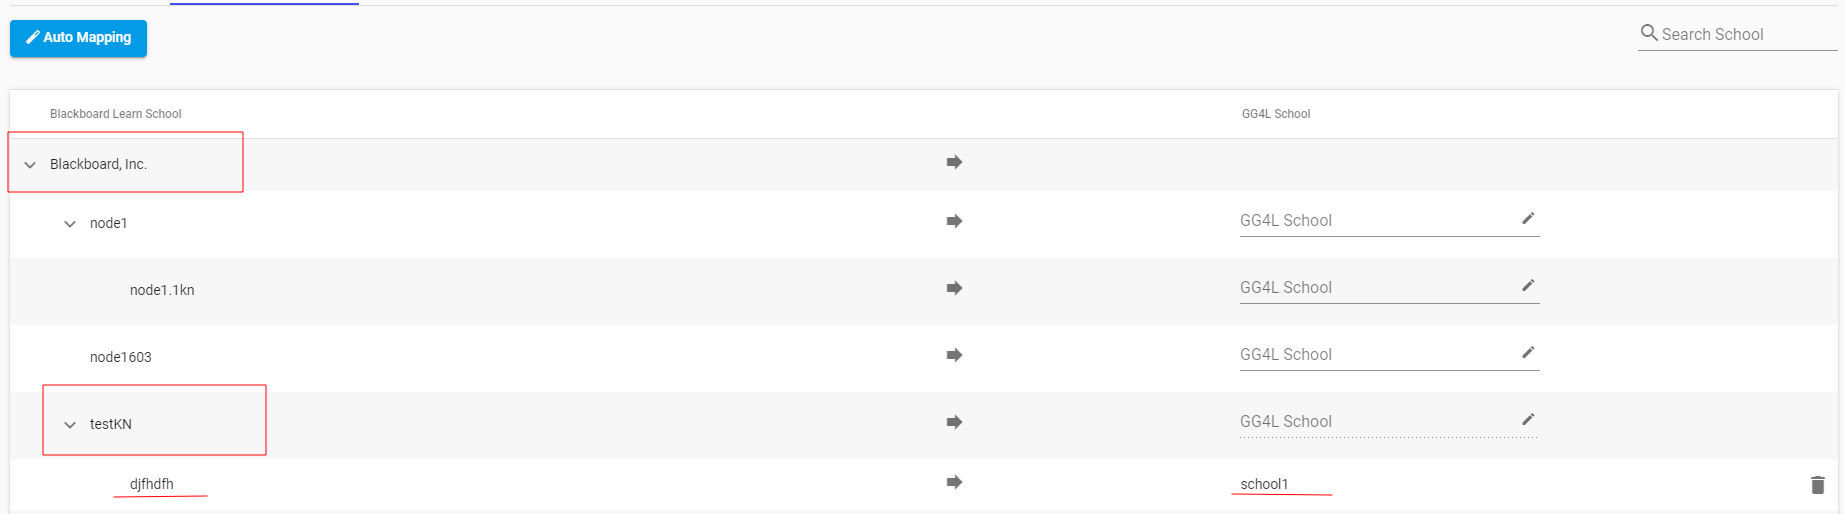
- Click Next >.
Step 5. Completing configuration
Leave the remaining settings at their default values and click Finish Configuration.
Please, contact onboarding@gg4l.com as soon as you complete the above steps or if you need any assistance.
Gradebook
Supporting Grade Sync to Blackboard offers flexible grading options that cater to diverse grading methodologies used by educators.
Important: Grade Sync for Blackboard is only available for Import.
To activate Grade Sync for Blackboard Learn, please reach out to support@gg4l.com and submit a request.
To prevent data duplication when synchronizing data from Blackboard Learn and the SIS to School Passport, it is required to establish the merging rules (master fields) for gradebook entities.
When Grade Sync is successfully activated for PowerSchool, there are gradebook entities appear in Blackboard`s Attribute Mappings and Master Fields:

After data syncing, the Gradebook data displays at the Data Browsing > Gradebook.
Note:
If PowerSchool SIS is used, there are duplicates of categories created in the School Passport for all classes for each teacher.Also, there are External IDs will be generated for gradebook entities in Metadata Extension pane:

The naming convention for External IDs is as follows:
- For Categories, the External ID is XXX_YYYY, where XXX - Blackboard`s course ID, and YYY - сategory`s title (in lowercase).
- For Line Items, the External ID format is XXX_ZZZ, where XXX - Blackboard`s course ID, and ZZZ - line item`s title (in lowercase).
- For Results, the External Id format is XXX_ZZZ_QQQ, where XXX - Blackboard`s course ID, ZZZ - line item`s title (in lowercase), and QQQ - UserExternal ID (if blank, uses SIS ID).
Master Fields
To prevent data duplication when synchronizing data from Blackboard Learn and an SIS to School Passport, it is necessary to set up the Master Fields for various data entities.
Once all apps are configured, do the following:
- Click Data Quality > Duplicates > Master Fields.
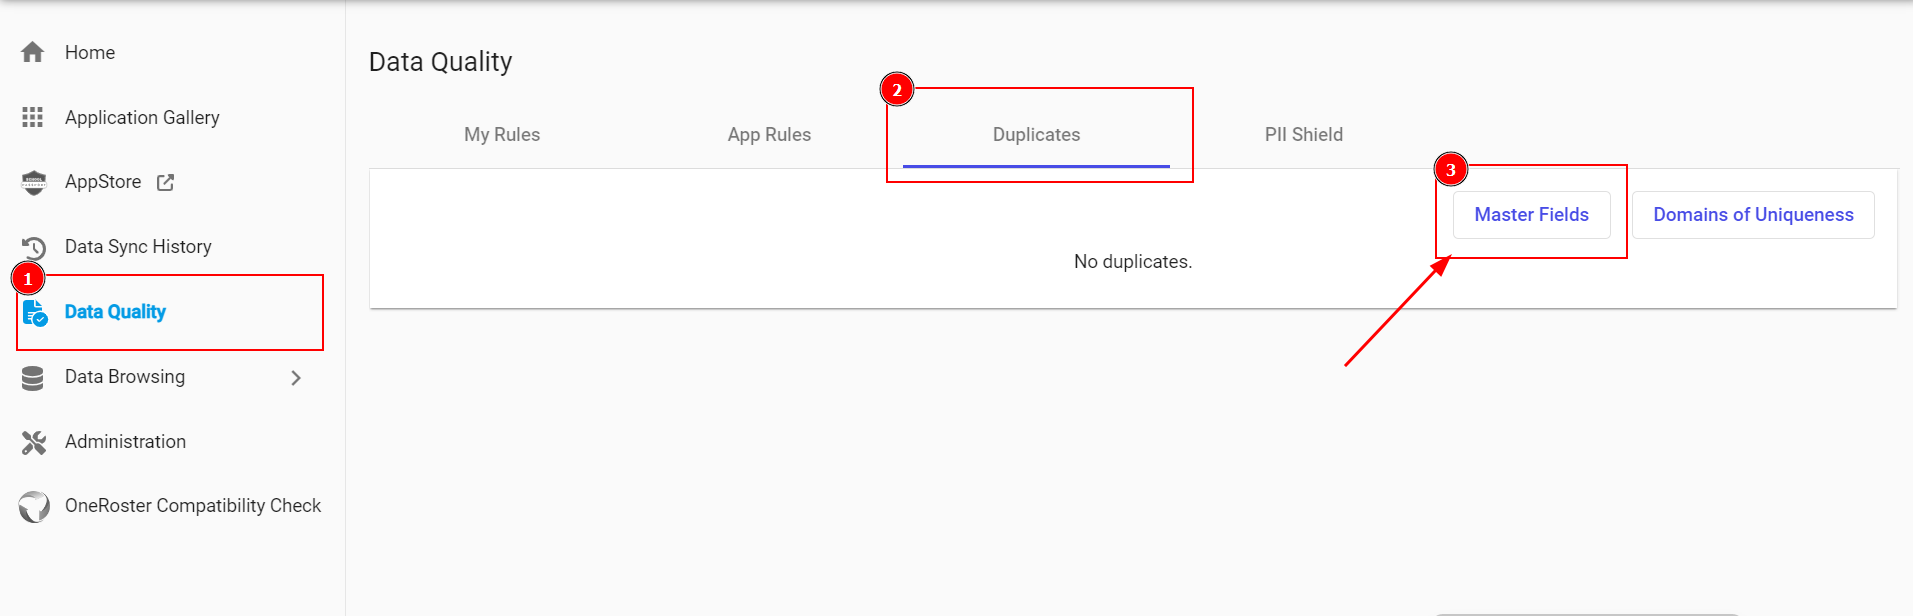
- In the Master Fields, carefully review the existing merging rules.
- Remove the listed attributes for the following entities, if they are present:
- Student: Classes, Other Enrollments, Student Contacts
- Contact: Contact Relationship, Contact Type, Other School IDs, Relationships, School Id, Student Id
- Teacher: Classes, Other Assignments
- Course: Classes, Other School Ids, School Id
- Class: Calendars, Other Teachers, Students
- Calendar: Children, Classes, Other School Ids, School Id
- Ensure that the "Master" modifier is applied to the merging rules for rostering entities (Student, Contact, Teacher, Class, Calendar) in the SIS application. If this modifier is already present, remove or edit it.
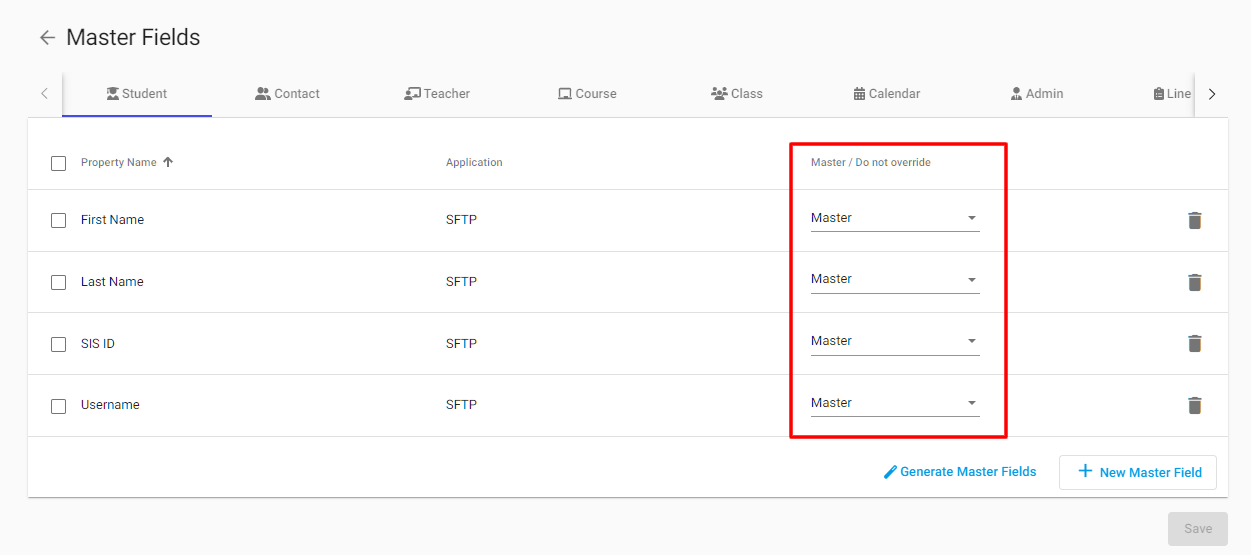
- To create new merging rules, click Generate Master Fields.
- Select a property and add merging rule details:

Type
Entity
Property
Application
Mode
Roster
Student, Contact, Teacher, Class, Calendar
All properties, except of outlined earlier
SIS app
Master
Gradebook
Line Item, Result, Category, Assessment Line Items, Assessment Results, Score Scales
All available properties
Blackboard
Master
- Click Generate.
For more information on the merging rules for gradebook, refer to the Manage Master Fields for Grade Exchange.
Preview and Sync modes
After setting up a Blackboard Learn 2-way sync, the District Admin can run the data processing in one of the following modes:

- Sync mode: Imports and exports updates to Blackboard Learn to ensure seamless data synchronization between systems.
- Preview mode: Imports data from Blackboard Learn and shows a preview of users who will be exported or updated during full synchronization. This process also identifies any potential issues that may need attention.

Caution:
If the username field is left empty, the entities will not be exported to Blackboard Learn.
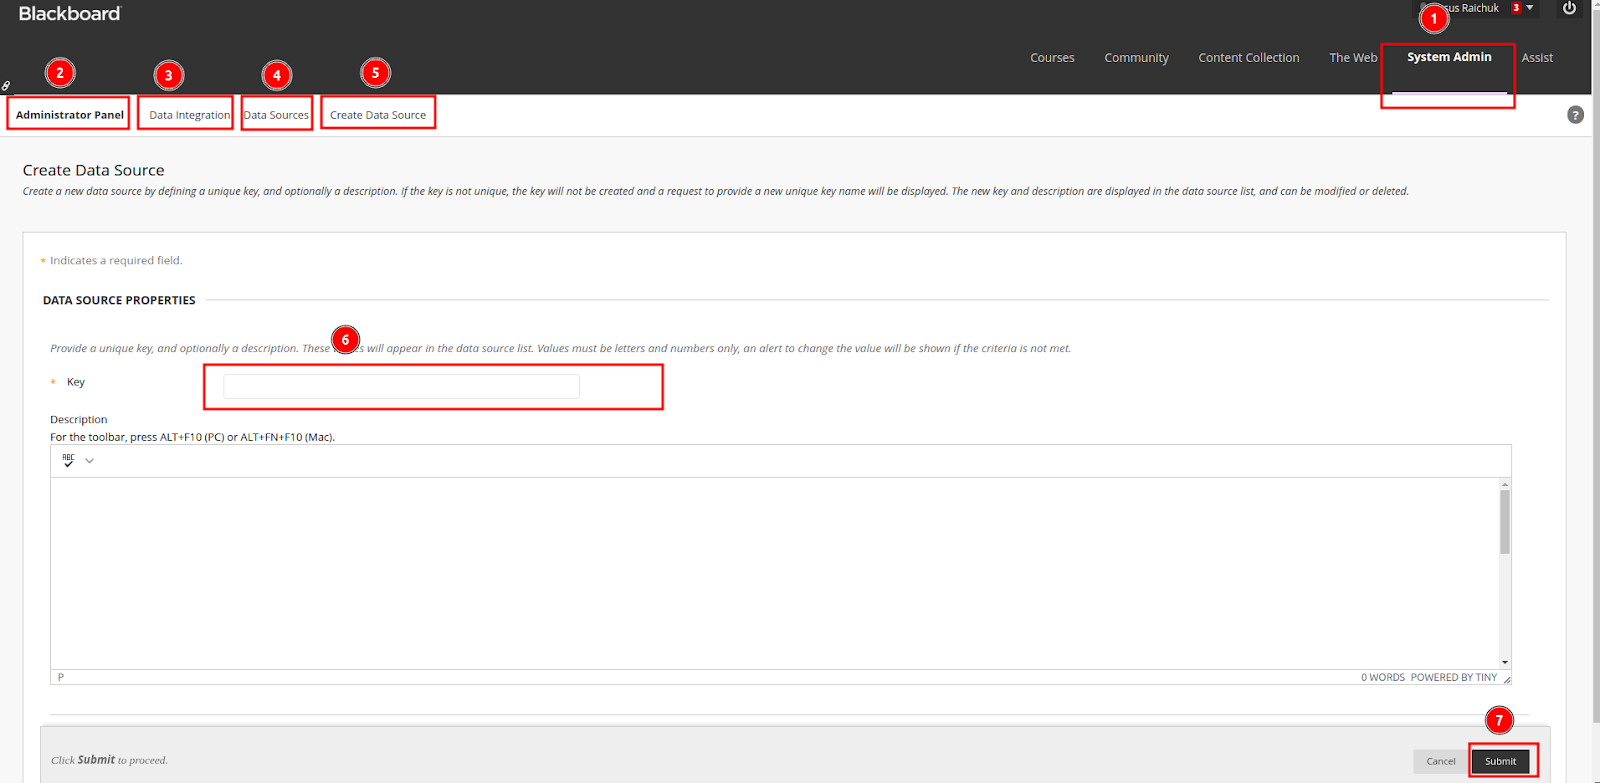
To initiate REST integration, copy the Application ID in the Connect.
To register a REST Integration in Blackboard Learn do the following:
- In School Passport, go to Connect > Blackboard Learn > Settings > Delivery Config and copy Application ID.
- Log in to Blackboard Learn as an administrator.
- System Admin > Integrations > REST API Integrations.
- Select Create Integration.
- Enter the Application ID from School Passport into the corresponding field in Blackboard Learn.
- Select Browse next to Learn User. Search through the list of Blackboard Learn users to find the user that the integration should act as. Typically, an integration acts as Administrator or some other user created for integration management. Ideally, the user has only the permissions that the integration needs to function properly.
- For third-party integration, set End User Access to Yes. End users will sign in with their own Blackboard Learn ID to use the integration. Each user's access is then limited to his or her own permissions.
- If you set End User Access to No, the integration always has access as if it were the Blackboard Learn user indicated on the form.
- Submit to save your settings for the integration.
For more details, refer to the Blackboard Learn Help Center, Building Blocks and REST APIs.
Obtaining DSK in Blackboard Learn
The Data Source Key serves the purpose of categorizing data and associating it with specific systems, enabling visual management of data within Blackboard Learn. These keys are referenced in data feeds and integration configurations to establish the connection and ensure seamless data synchronization between the systems.
Only data that is under a specific Data Source Key will be synchronized with School Passport. All the data, exported from the School Passport, will be stored in Blackboard Learn under the same DSK (the one that is saved in the Delivery Config).
However, it is recommended to update the DSK in your Blackboard Learn instance to ensure smooth operation with the new DSK. Additionally, the DSK is editable only when data sync is suspended through the activated "Data Rollover" functionality.
To paste the DSK from your Blackboard Learn, do the following:
- Log in to your Blackboard Learn as an administrator and navigate to: System Admin > Integrations > Data Integration.
- On the Data Integration page, select Data Sources.
- Click the Create Data Source.
- Generate a DSK and copy it (recommended pattern: SP_2023-2024, where 2023-2024 is the next studying year; a new Data Source would be created for every next School Year; users that returned for the new School Year will be updated with the new DSK. This will separate last year’s classes, graduated students, and retired teachers/staff from the currently active data).
- Click Submit to save your settings.
For more details about DSK, refer to the Data Source Key Overview article.