Data Sync of Grades and Resources
School Passport now supports Grading & Resources profiles of IMS One Roster v1.1 specification. School Passport Administrators can synchronize Grades and Resources data between SIS and EdTech applications.
To provide you with the ability to monitor / manage Grades and Resources data in the School Passport we split Data Browsing section into three subsections:
- Rostering (subsection that allows you to manage all rosters data);
- Gradebook (subsection that contains “Results”, “LineItems (groups of Results aligned to an assessed activity), “Categories” (groups of LineItems), “ScoreScales “(introduced in this version), “AssessmentResults”, “Score Scales” and “Categories” data. This subsection provides the ability to manage the exchange data mentioned above).
- Resource (subsection that provides the ability to manage the allocation of resources to classes, courses and users. Contains a description of a resource with sufficient information and the resource itself.

Enhanced Gradebook syncing capabilities for LTI 1.3 compatible LMS
School Passport can sync scores and deep link to hierarchically structured units that constitutes a learning course in LTI Tool. Learners’ progress is synced to LMS incrementally.
School Passport supports two options for a granular grade sync.
Option A. LMS Instructor is responsible for creating LMS contents that are LTI deep-linked to gradable items that constitute a Coursera course. LMS gradebook will be populated with the entry for each deep-linked LMS content that corresponds to a gradable item of the Coursera course.
Option B. LMS Instructor will create a single LMS content that represents the entire Coursera course. School Passport will populate the LMS gradebook with entries for all gradable item(s) that constitute a given Coursera course.

To set up “Granular grade sync”:
- Select “Granular grade sync” for Coursera Data Sync to enable synchronization of learning results from Coursera to LMS at the level of gradable item(s) that constitutes a Coursera course.
- Choose one of two options for a granular grade sync.
Improvements to data sync with PowerSchool SIS
Data import connector for PowerSchool got the support for the following features:
- co-teachers in classes;
- ability to filter Contacts by their attributes;
Co-teachers in classes
PowerSchool data source supports Co-Teacher Roles in Sections.
Important Note: By default, GG4l does not sync co-teachers data from PowerSchool SIS. If you want to sync co-teachers data, you need to install a new PS plugin. Please contact support@gg4l.com with a request to provide you with a new PS plugin for the co-teachers sync.
To set up co-teachers sync follow the instruction below:
- Please contact support@gg4l.com with a request to provide you with a new PS plugin for the co-teachers sync.
- Install new PS plugin and update API credentials for PowerSchool (OAuth Client ID, OAuth Client Secret) in your School Passport account.
- Click on the “Advanced Settings” and mark the corresponding checkbox “Sync Co-Teachers''. The warning window will appear. Click “Confirm” to continue.

- Save changes and force data sync by clicking the “Run Import” button on the PowerSchool dashboard.

Ability to filter Contacts by their attributes
There is the ability to filter contacts by their attributes.
Important Note: To filter contacts by “canAccessData”, “custodial”, “guardian”, “livesWith”, “parents”, “receiveMail”, they should be coming from the Contact module (Unlimited contacts) of PowerSchool data source. Also, there should be corresponding access to the mentioned contacts attributes in the PS plugin. Please, make sure the GG4L plugin has access to these attributes.
To filter Contacts by their attributes follow the instruction below:
- Log in to your School Passport account and click on the gear icon on the PowerSchool dashboard.
- On the “Delivery Config” tab click on the “Advanced Settings” uncheck the checkbox in front “Do not use Contact Module” and choose attributes you want to use for filtering contacts.

- Save changes and force data sync by clicking the “Run Import” button on the PowerSchool dashboard.
Note: If you activate filtering by parents, our system will filter all the users by contact relationship (mother, father). If you activate filtering by the guardian, our system will leave users with relationship guardians.
There is the ability to choose multiple attributes to filter contacts.
PII Shield enhancements
School Passport Administrators can switch on/off PII Shield using the toggle-switch in Admin Console. Data masking applies to both data sync and Single Sign-On.
We've made some changes to the PII Shield feature. Now PII Shield is a separate block in a Request view (screenshots 1, 2, 3).
Deactivated view:

Activated view:

When it is "turned on":
- data masking is enabled for those attributes, which Vendor has enabled Data masking ability and which District Admin has set as Sensitive in PII Shield tab of Data quality menu;
- Sensitive attributes won't be shared. But some attributes can be required (it depends on Data schema) and can't be excluded from sharing. In this case, PII Shield will be enabled partially (for affordable attributes), but the UI of the PII Shield feature will be shown as "turned off".
On toggle "turn on/off" PII Shield button we will show dialog (screenshot below) with attributes list for which:
- is enabled Data masking;
- is disabled sharing;
- is impossible to turn off sharing because attributes are required.

PII Shield will be turned on by toggling the button in the request.
For applications in which Sys admin has set PII Shield badge in the application config, PII Shield will be automatically turned on while creating the first request (dialog Apply PII Shield will be the very first thing that user will see on the Create Request page).
We could do it another way:
1 - PII Shield will be automatically turned on for all applications (but in this case, showing dialog at once after loading the Create request page is a disadvantage);
2 - PII Shield will be automatically turned on for all applications but we won't show the dialog. We will show dialog only when the User clicks on the button in the PII Shield block.
3 - PII Shield dialog will be shown only when the User is "turning off" PII Shield or if there are attributes that are simultaneously required and Sensitive data.
After activation of PII Shield on the Request page User can revert changes made by PII Shield by clicking the "Revert PII Shield changes" button:

If in the request are attributes that are simultaneously required and sensitive, and the user has "turned on" PII Shield, but after that, he is trying once again to "turn on" partially "turned on" PII Shield - we will show a message in the bottom of the page: "PII Shield is already applied":

Sync improvements for Veracross SIS
The data import module for Veracross SIS has been integrated with the native API of Veracross SIS. That allows syncing a richer data set compared with the one available through One Roster API endpoints.
To configure the Veracross application you need to open the Application Gallery section, navigate to the search field, and start typing the name of the application. In the search results, find Veracross App and click the ACTIVATE button.

You will be prompted to make several steps of configuration:
- Set up Delivery Config: insert Username, Password, School Abbreviation and choose API Version.

After this manipulation, file up the required fields with the received credentials. There are also** Advanced Settings** present here. Press the button like this to get there:
You will be offered to populate checkboxes related to additional settings. There are four checkboxes responsible for the following settings:
- Bulk upload mode. The system will detect deleted records based on comparison with the last upload.
- Data will be uploaded from multiple data sources (for example, from the SIS and the Active Directory). Do not check the box if you plan to upload data from a single data source (e.g. only from the SIS).
- Compare records according to the Domains of Uniqueness.
- Preview of data upload (you will have to approve every data sync). Your new data will be not available until you accept the changes. There is the ability to set up a “Sync hold threshold”. If the system detected significant changes, updated data would not be available for export until you approve changes.
Also, you will be offered to populate the SIS IS prefix’ field. The prefix is used mainly for multiple Data Sources of the same type to avoid merging entities with equal SIS IDs.
Note: Bulk upload mode is set up by default.
After that you can Test Connection with Veracross’ SIS. To do that click the corresponding button:

- The next step is School Mapping. Select all or individual schools’ data you want to synchronize with GG4L Connect Module. To choose an individual school just drag the button slider to the right, opposite the school you need. To select all, click the Auto Mapping button.

- In the third step, you will be prompted to set up Attributes Mapping. Here you can configure under what attributes data of a separate entity from Veracross will be synchronized with GG4L Connect Module.

In this step, you can finish the configuration or continue to configure further settings.
- Data Requirements. To set up data requirements and select an action if data is missing: report if missing or skip if missing, put checkboxes to choose the action you need. If the 'report if missing' or 'skip if missing' checkbox is activated, the missing attribute error will be reflected at the 'Data Quality' with an error. The data marked solely as 'skip if missing' will not be imported to GG4L. If you want to leave this configuration marked with default settings, just skip this step.

- In the fifth step, you will be prompted to set up Filter Rules. You can customize data filtering by different entity types. There are seven entity types: student, contact, teacher, course, class, calendar, admin. To make the filtering process easier to use the ready-made templates are provided. In the ready-made templates, the additional attributes for more accurate filtering are present. Also, you can add a Custom Filter where custom attributes and conditions can be used. To Add Filter Rule click the corresponding blue button or skip this step.

- In the sixth step, you will be prompted to set up Domains of Uniqueness. Domains of Uniqueness define parameters that require to be unique. The main goal of Domains of Uniqueness is to avoid duplicates in the data system.
There are seven entities you can set DoU for: Student, Contact, Teacher, Course, Class, Calendar, Admin.
Аttributes (Domains) of Uniqueness such as First Name, Last Name, and Email are set by default, but you can also set other attributes that need to be unique: birth date, gender, grade, phone number, etc.
To add a New Master Field click select the application from which the data will be sorted then click the add button like that:

The next step is selecting the entity in which you need to configure Domains of Uniqueness.

Select the required Domains of Uniqueness. After everything is set, click the next arrow button.
- In the Schedule section of Configurations you can set up periodicity (daily, weekly) and exact time of data synchronization. You can also choose the date by when the sync will be executed. After everything is set, click the next arrow button.

- The Done section of configurations is the last one. If everything is set up as you need it, click the Finish button to end configurations.

Note: from the 3rd step you can skip and finish the configuration.
After this configuration, the application is ready to start data synchronization.
AppStore Permissions for Teachers
School Passport Administrators can delegate class level AppStore administration to Teachers. Teachers can activate SSO and manage Bookmarks for students in their classes.
Important note: To manage App Store Permissions, you have to be logged into the Connect module through School Passport Portal (https://sso.gg4l.com/).
To assign AppStore permissions for teachers, follow the instruction below:
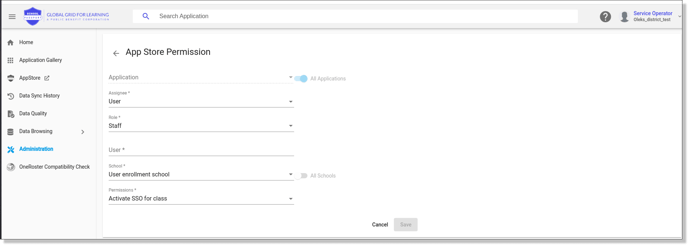
- Navigate to the Administration section-> AppStore Permissions and click the plus button in the below right corner.
- Select the application for which you would like to add AppStore permissions;
- Choose to whom you would like to assign permissions. User - if it should be a single teacher; Role - if it should be all the teachers.
- Role staff will be set up by default;
- In the users' box, find the needed user by typing their first/last name;
- Choose the School where the teacher needs to have AppStore permissions;
- In the "Permissions" row, check the "Activate SSO for class" checkbox. In this case, the teacher will be able to manage all or chosen SSO App.
For more information regarding (SSO Application management), please refer to the AppStore Overview (SSO Application management).
New Special Offers in App Gallery
Coursera4Schools and Surf Wisely are two new Special Offers that School Passport Administrators can activate through GG4L free of charge.
Coursera4Schools - GG4L has partnered with Coursera, a leading online learning provider, to give high school students unique opportunities to gain leading industry credentials in high-demand technical skills, preparing them for entry-level jobs in IT. The program provides:
- Industry Recognized Credentials to prepare students to compete for and succeed at the jobs needed in today’s economy. The credentials offered through the Coursera Academies are endorsed by major IT Vendors and top universities, providing strong employer acceptance.
- Student ability to complete credentials. Coursera credentials range in four levels from conversant to advanced, with content that can be utilized across a variety of existing student capabilities, ideal for entry-level work. Over a dozen ready-to-deploy pathways are ready to be integrated into existing course programs or offered for self-study.
- One-Stop-Shop for Multiple Certificates (Skill Sets, Academies, and vendor programs), providing many options for students and simplifying deployment for the district.

Surf Wisel - An innovative app that provides everything that your school needs to make its cyber security defense the very best it can be. SurfWisely's mission is to make Security Awareness training enjoyable and fun.
With the continued problem of security awareness training not being relatable or keeping users engaged SurfWisley was formed. Through the increase of security incidents and seeing most incidents could have been prevented. SurfWisely created fun, interactive training to help schools and students stay safe.