This article explains how to create and use Google Workspace IDM to provision a user or group in seconds.
In this article
Step 2. Select synchronization mode
Google Workspace Identity Management (IDM) application automates the setup and management of user accounts (provisioning) in Google Workspace, ensuring that users have the necessary access and permissions. District Admins should only provide a few configuration details to set up the provisioning process. Then, users who are imported from a data source and match the configuration details will automatically have a Google Workspace account provisioned for them. Provisioning is a one-time per-user. Any given user can only have one Google Workspace account provisioned for them.
Google Workspace IDM is available for non-SchoolDay members (with no SP EE subscription) only in a preview mode.
Advantages
-
Helps schools deploy Google Workspace faster.
-
Eliminates provisioning errors.
-
Improves identity governance, accountability, compliance, and information security, and protects data privacy.
-
Simple to apply.
Prerequisites
-
Google Workspace: Sign in to your Admin console.
-
SchoolDay: Sign in as Primary District Admin.
-
Direct API integration with one or more Import apps (data sources).
-
Back up Google Workspace. You can use Google Vault or other tools.
Global recommendations
-
Email addresses: If a domain name in emails that are coming from the customer's SIS differs from generated emails, then SchoolDay will overwrite them in SchoolDay and Google Workspace, taking generated value as a primary and only one. When a domain is correct, emails will not be replaced.
-
Group provision: Be cautious with activating the Group provision to Google Workspace. It can lead to the filling out of your Google Workspace with thousands of roster Classes as Google Groups. As a result, activating the Group provision can lead to degraded use of Google Workspace. To avoid this, select the Group provision options and set the Group Mapping provisioning for each Class. For details, in this document see Enable Group provisioning.
- Domains of Uniqueness: To avoid duplicates, for each data source used in provisioning, turn on Compare Records. To learn more, see Duplicates.
-
Safety Threshold: To prevent large unintended changes to the Google Workspace, set Safety Threshold to 10% for each Import app, including for Google Workspace IDM in Import sync mode. To configure Safety Threshold, read Setting up Data Preview Mode & Safety Threshold.
Provisioning process
At a high level, the full provisioning process looks like this:
-
You add a Google Workspace IDM app to manage who gets access to the district`s Google Workspace. The Google Workspace IDM is the engine that builds, configures, and makes Google Workspace accounts available to end users.
-
When a user in the district user group matches the configuration details, Google Workspace IDM automatically provisions a Google Workspace account for the user. This automation has three stages, which are invisible to the administrator.
-
Once provisioned, the end user can then sign in to Google Workspace from anywhere.
The provisioning process attempts to show the steps that the Google Workspace IDM takes when provisioning a user. There are typically five steps to provision a user. The following steps go over parts of this process in more detail.
Step 1. Start provisioning
-
Sign in to SchoolDay.
-
Go to the Application Gallery. A list of all configured apps is shown. To look for Google Workspace IDM, use the search bar or filters on the left.
Tip: If you clear the Import and Export filters while looking for the Google Workspace IDM app, then after activation it will automatically run in 2-way synchronization mode..png?width=202&height=289&name=Clear%20Import%20(1).png)
-
Find and select the Google Workspace IDM app.
Note: Do not confuse this app with the Google Workspace app. Google Workspace is an import-only app, not for provision. -
On the app’s page, click Activate. On the dialog that shows, consent to the import of data from Google Workspace. The Google Workspace IDM configuration page appears.
Note: To commit any changes, after each step, at the bottom right, click >.
Step 2. Select synchronization mode
The Google Workspace IDM configuration page begins with a Sync mode step, which shows the provisioning modes supported for an app, and lets you configure them. The available options include:
-
Import
Data changes introduced on items in source and target folders are propagated in one direction - from Google Workspace to SchoolDay. With this mode, Google Workspace IDM is used as a data source. -
2-way sync
Data changes introduced on items in source and target folders are propagated in both directions. That applies to create, edit, and delete operations.
If you activate the Google Workspace app when the Import filter is clear, the Sync mode step skips and the app runs in 2-way sync mode.
Step 3. Manage data delivery
After choosing sync mode, in the Delivery Config step, configure the main parameters of data provision, for example, the selection of a Google Workspace account or Group provisioning settings.
Tip: Set Safety Threshold to 10% for each Import app (including for Google Workspace IDM). To configure Safety Threshold, read Setting up Data Preview Mode & Safety Threshold.
Authorize access to Google
To provision accounts, SchoolDay must be granted access to manage the provisioning of users on your domain. On the Delivery Config step, grant access to your Google Workspace, by clicking Sign in with Google.
On the dialog that appears, choose your Google Workspace account. The user authorizing the access request must have the permissions to grant access to the following scopes:

Enable Group provisioning
Caution: Be cautious with activating the Group provision to Google Workspace. It can lead to the filling out of your Google Workspace with thousands of roster Classes as Google Groups.
Note: Group provisioning can be set only during the first configuring of Google Workspace IDM.
Optional you can automate your workflow by enabling Group provisioning features: Import Groups as Data (Classes) or Export Roster Data (Classes) as Groups.

To enable Group provisioning, do the following:
- Select Export Roster Data (Classes) as Groups.
- Optional. Select Import Roster Data (Classes) as Groups.
Caution: If you have activated Export Roster Data (Classes) as Groups, after the first sync Google Workspace IDM will provision Classes (that were mapped in the Mapping Rules step) as Google Groups to your Google Workspace. After the second sync session, Google Workspace IDM will mark them with to be deleted status. To avoid marking them with to be deleted status, set Group Mapping for the Google Groups provisioned in your GW after the first provision session. - Set Group mapping rules for Classes/Groups.
During the second sync, Google Workspace IDM automatically updates Google Groups that have mapping rules. Other Google Groups (without set mapping rules) will have to be deleted status.
Step 4. Select users
On the Entities step, choose the type of users that you want to provision to Google. You may select the following types of users:

-
Students refers to users who are enrolled as a student in an educational course or section.
-
Teachers refers to users who are enrolled as staff, and responsible for a particular group of students
-
Group refers to Google Groups that can be imported from Google Workspace as Google Groups or Classes.
-
Class refers to Classes that were imported from the data source and can be exported (provisioning) to Google Workspace as Google Groups.
-
Admin (Staff) refers to any users who are provided services to a school, except teachers.
Note: Users with the same email address in SchoolDay and Google will be matched/organized in the OU structure as outlined in the OUs Mapping step. SchoolDay will not update the email address for existing Google accounts.
Step 5. Set mapping rules
On the Mapping Rules step, you can organize users into your existing Google OU structure.

Create Mapping rule
- To create a provision rule, do one of the following:
- Click New Mapping Rule at the top left.

- On the OU’s tree, find an organization that you want to map and click ➕ New Mapping Rule next to its name.

- Click New Mapping Rule at the top left.
- On the Add Mapping Rule page that appears set mapping rules:
- On the OUs and Groups panel, click Select OU and Groups, and then find and select one or more OUs or Groups that you want to map.
- On the SchoolDay Users panel, click Type and select SchoolDay User. Optional, configure other fields.

- When you are complete configuring, click Done.
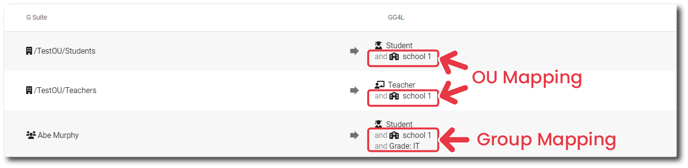
There are two types of mapping rules that need to be configured to provision the Classes (imported from SIS) as Google Groups:
- OU Mapping includes specific or all Classes associated with the school to the corresponding OU Mapping Rule.
-
Group Mapping separates Group Mapping for each Class that needs to be provisioned as GW Group.
Set archive OU
Google Workspace IDM allows the district to determine the OU where a deactivated user (in the district's SIS, his account has to be deleted status) should be placed. Deactivated users will be suspended in Google and placed in the Archive OU during the next Google Workspace IDM sync.
To customize archive OU, do the following:
- At the top, click Change Archive OU.

-
On the Set Archive OU page that appears, check the box next to OU you want to use as an archive.
-
Click Save.
Monitor your rules
The resulting OU structure will be available for preview on the Raw Mapping Rules tab. Here you can browse and define all existing rules (OU Mapping and Group Mapping).
If you supply imported Classes as Google Workspace Groups and you don't have mapping rules for Classes/Groups, SchoolDay will provision all the Classes as Groups to Google Workspace after the first sync. For details, in this document see Enable Group provisioning.
To avoid this, set up Group Mapping for the Groups provisioned in your Google Workspace after the first provision session.
Use Mapping Rules Generator
When you create the first mapping rule, you can use it as a template for other OU with help of the Mapping Rules Generator.
To set Mapping Rules Generator, do the following:
-
After setting mapping rules, you will receive a notification. At the notification, select Mapping Rules Generator.

-
On the Mapping Rules Generator, set features:

- To select the user types, for which you want to use templates, click Type and select one or more types.
- Optional. To select the OUs that you want to use in Generator, click Set Base DN. On the page that appears, select one or more OUs and sub-OUs for which you want to use templates, and click Done. By default, the tree root is selected.
- Optional. To add exception items for which you don`t want to apply Generator, click Set Exclusion list. On the dialog that appears, select one or more OUs from the dropdown, and click Done.
- To select schools, for which you want to apply the Mapping Rules Generator, click the School box and select a school from the list.
-
Click Generate.
When setting up provisioning, it's important to review and configure the Attribute Mappings that define which user or group properties flow from SchoolDay to the Google Workspace. Review and configure the matching property that is used to uniquely identify and match users/groups between the two systems. You can customize it on the Attribute Mapping step.
Tip: Because some attribute mappings are necessary for the correct work of the Google Workspace IDM, SchoolDay recommends leaving this step by default.
Step 7. Set login credentials
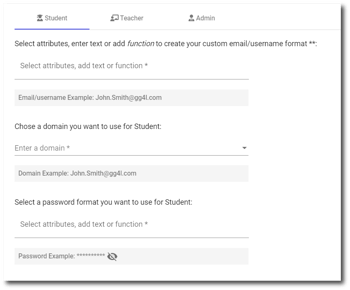
On the Login Credentials step, set the rules by which users' credentials will be generated. District Admin can set up Emails/Username and Passwords format in the Google Workspace IDM app. Based on chosen user types for provisioning, there will be available sections to set up login credentials for respective categories of users.
Note: The SchoolDay format password will be used only for the user's first login to Google. After the users' first time entering their account, they'll be required to change their password.
The following table displays attributes that you can use to set up Email/Username and Passwords.
|
Attribute Name |
Supported for |
|
First Name |
Students, Teachers, Staff |
|
Last Name |
Students, Teachers, Staff |
|
Middle Name |
Students, Teachers, Staff |
|
SIS ID |
Students, Teachers, Staff |
|
Primary School Name |
Students, Teachers, Staff |
|
State ID |
Students, Teachers, Staff |
|
Student Number |
Students |
|
Birth Day |
Students |
|
Teacher Number |
Teachers |
|
Username |
Students, Teachers, Staff |
Note: If a duplicated email and/or username is found while syncing, SchoolDay will add an incremental number for a duplicate. For example, when two emails john.smith@test.com are imported, then one remains unchanged, and a 1 is added to the second address - john.smith1@test.com. You can browse duplicates on the Data Quality tab (Username column).
For username and password recommends following naming guidelines:
-
Username - Name guidelines for users and groups.
-
Password - Enforce and monitor password requirements for users.
Once a user has set his password, the system checks its reliability according to Google security requirements. For more information, see Security Requirements.
SchoolDay offers you to combine attributes data in email, username, and password. When these aren’t enough for your needs, you can use custom functions.
The following table demonstrates obtaining results for function on the example of user Felica Walker.
|
Function |
Description |
Example |
|
firstChars |
Returns first characters, as many as specified. |
{firstChars(firstName,2)} For first name Felica returns Fe. |
|
lastChars |
Returns last characters, as many as specified. |
lastChars(lastName,3)} For last name Walker returns ker. |
|
substr |
Returns part of the string from the start index up to and excluding the end index. |
{substr(lastName,1,3)} For last name Walker returns alk |
|
textBefore |
Returns text that occurs before a given character or string. |
{textBefore(email,@)} For email myriam.fuchs@district.com returns myriam.fuch. |
|
initial |
Returns the initials of a value. |
For last name Madikizela-Mandela returns MM. |
|
firstWord |
Returns the first word of attribute. |
{firstWord(lastName)} For last name Baron Cohen returns Baron. |
Step 8. Finish provisioning
After you configure user’s login credentials, you can do one of the following:
-
Force the finish configuration process by clicking Finish Configuration at the top right. The remaining steps' options will be left by default.
-
Configure Data Requirements, Filter Rules, Domains of Uniqueness, Master Fields, and Schedule steps. On the Done step, click Save and Publish.
Step 9. Review data
When you complete a provisioning process, you will be redirected to a Google Workspace overview page. Here click Preview sync to transfer data from Google Workspace.
Check provision preview
When your preview has been synced, you can manage its data through the SchoolDay. The data that was provisioned will be displayed in the Google Workspace IDM > Home. There is a full amount of users that will be created/updated/deleted after its provisioning in the 2-way Sync Summary. To get more information about modified users, click on their amount.

Diagnose and solve data quality issues
In the SchoolDay, you can find data quality issues on the Data Quality tab. For more information, see Data Quality.
There are two types of data quality issues:
|
Issue type |
Impact |
Fixing |
Description |
|
Skipped |
Hight |
Must be fix |
If a record is flagged by a Skipped the respective data object will not be provisioned to Google Workspace. This type of error means that the indicated quantity of users or sections does not have enough data for provision to Google Workspace. Data errors should be resolved in the data source or SIS. |
|
Errors |
Low |
Optional |
If a record is flagged by a Data Warning, the user or section has a compatibility issue with the application that may result in a degraded Google Workspace experience. Also, this error means that the indicated quantity of users or sections does not have enough data for provision to Google Workspace according to Google’s requirements. However, the data of these users will be provisioned to Google Workspace. In most cases, Data Warnings are ignored. |
When you check the data preview and amend data quality issues, you can start the provisioning process by clicking Run sync.