.svg)
This article describes how to connect a remote SFTP server with the School Passport via FTP clients.
In this article
Connecting to remote SFTP server via FileZilla
In order to configure CSV files export from your local folder to the SFTP, you first need to configure SFTP import in School Passport, and then you will be able to connect to the GG4L remote server and send the files there. You can set up the automation process between your local folder and the remote SFTP server by following the instructions: Automated files transfer to SFTP from a local folder.
To enable automatic file exports from your SIS to the remote SFTP server, please check with your SIS support for the possibility of setting up a data extract. If your SIS does not support auto data extract to SFTP, please follow the instructions below.
Prerequisites
- Primary District Admin permissions are required.
-
Export your school’s roster data from your SIS in CSV files in one of the supported formats (OneRoster 1.0, 1.1, and BasicRoster) and save it on your computer.
-
Download and install WinSCP or FileZilla. For more information about installing, see WinSCP Installer or FileZilla Client Installation.
- Create an SFTP Import in School Passport and run sync.
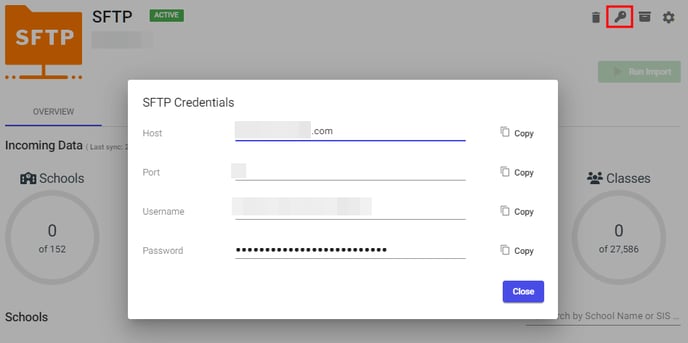
Get SFTP credentials from School Passport
To obtain the remote SFTP server credentials, navigate to the required SFTP Import, click SFTP Credentials on the top right, and copy Username and Password.
Connecting to remote SFTP server via FileZilla
-
Run FileZilla.
-
On the Quick Connect bar:

-
Host: upload.gg4l.com
-
Port: 22
-
User name and Password: SFTP credentials for your remote server.
-
-
Click Quickconnect. Once a connection is established, files and folders on SFTP are displayed on the right side of the screen.
-
Under the Local directory, select CSV files (exported from your SIS) on your computer that need to be transferred and right-click the selection > Upload. Drag and drop between the two windows also work.

Connecting to remote SFTP server via WinSCP
-
On the desktop or in the Windows Start Menu, run WinSCP.
-
On the Login Dialog window enter credentials and click Login:

- File protocol: SFTP
- Host: upload.gg4l.com or your custom host.
- Port: 22
- User name and Password: SFTP credentials for your remote server.
- A warning message appears indicating that you've received a new host key from the server you've just connected to. This will always happen the first time you make a connection. On the warning that appears, click Yes.

- (Optional) If you don`t want to enter session data every time you connect, store them on the site. To save your current session, click the Session on the top menu and select Save Session as Site. To learn more, you can see Saving Opened Session.

-
Under the Local panel, find and select the files on your computer that need to be transferred, and drag and drop your selection on the remote panel.

- Click Copy to confirm the transfer.
Next steps
-
For WinSCP, set a scheduling for automated SFTP file transfer.
- You can set up automatic regular synchronization of your files to the GG4L remote server. For more information, see Automate file transfers (or synchronization) to FTP server or SFTP server and Schedule file transfers (or synchronization) to FTP/SFTP server.