.svg)
This guide shows you how to set up School Passport with Infinite Campus integration.
In this article
Setup Infinite Campus app on School Passport
Note: School Passport supports both versions of the Infinite Campus: API 1.1 (OAuth 2.0) and API 1.2. To activate Infinite Campus API 1.2, see this guide.
Caution:
Infinite Campus will no longer support OAuth 1.0 starting June 30, 2023. GG4L will support Infinite Campus API 1.1 with OAuth 2.0 starting June 26, 2023. Be sure to update the authentication for Infinite Campus in School Passport.
When you upgrade to API 1.2, all users will get new SIS IDs, which means they’ll be recreated in School Passport. Because of this, users will also get new GG4L IDs. Make sure to inform your Ed-Tech vendor and ask them to do a full data re-sync.
School Passport supports Secure Data Sync with a wide range of the district's student information systems (SIS). One of them is Infinite Campus (IC) SIS. Infinite Campus helps schools and their stakeholders by Transforming K12 Education. More than 2,000 districts use IC’s flagship student information system to streamline educational processes, promote stakeholder collaboration, and personalize learning.
To configure data sync with Infinite Campus (IC) SIS, perform the following steps:
Obtain API credentials
To configure the API sync you'll first generate API credentials in Infinite Campus:
- Sign in to your Infinite Campus admin console.
- Go to Instruction > Settings > Digital Learning Application Configuration (or System Administration > Learning Interoperability in the Classic Navigation)
- Click Add Application, scroll to the bottom, and click Connect to Other Applications.
- Enter "School Passport" as the application name.

- Click Generate New OneRoster Connection.
- Select your OneRoster version > Generate.
- Copy ClientID, Client Secret, Base URL, and Token URL.
To learn more on how to obtain the API credentials, see Infinite Campus Help.
Setup Infinite Campus app on School Passport
To set up Infinite Campus with grade options by activating the Grade Sync Service feature in School Passport. For more details, see how to enable Grade Sync in Infinite Campus.
Add Infinite Campus app from the gallery
- Sign in to your School Passport.
- Go to Connect > Application Gallery.
- Type "Infinite Campus" in the search box.
- Select Infinite Campus from results panel.
- Click Activate. Wait a few seconds while the app is added to your environment.
Configure Infinite Campus app
- On the Sync Mode, select the desired mode:
- (Recommended) Select Import to import roster and additional gradebook data from Infinite Campus SIS to School Passport. With this mode, Infinite Campus is used as a data source for School Passport.
- Select 2-way Sync to enable roster and gradebook data exchange between Infinite Campus SIS and School Passport. Updates made in either system will automatically reflect in the other. This feature is commonly used for integrations with LMS platforms such as Blackboard Learn.
- On the Delivery Config, enter your API credentials:

- Service URL: Enter the base URL copied from Infinite Campus. For OneRoster v1.2, the URL should end with
..../rostering/v1p2. For API 1.1, the URL should end with..../rostering/v1p1. - Client ID: Enter the Client ID copied from Infinite Campus.
- Client Secret: Enter the Client Secret copied from Infinite Campus.
- Authentication URL: Enter the token URL copied from Infinite Campus. The URL format is: https://<domain>/campus/oauth2/token?appName=<appName>.
- Service URL: Enter the base URL copied from Infinite Campus. For OneRoster v1.2, the URL should end with
- (Optional) Click Advanced Settings to configure additional delivery config options:
- SIS ID Prefix: Use this if you have multiple data sources of the same type, to avoid merging entities with the same SIS IDs.
-
Bulk Upload Mode: Select to detect deleted records by comparing them with the previous upload.
- Data will be uploaded from multiple data sources: Select if uploading data from multiple sources (e.g., SIS and Active Directory). Leave clear if uses a single source (e.g., SIS only).
- Compare records by Domains of Uniqueness: Select to activate duplicate detection.
-
Preview of data upload: Select to manually approve every data sync. New data won’t be available until you accept the changes.
-
Sync Hold Threshold: Set a threshold for significant changes. Updated data won’t be exported until you approve the changes.
- (Optional) Click Test Connection to verify the connection with Infinite Campus SIS.
- Accept the Terms of Use and/or Privacy Policy. Click Next.
- In the Schools Mapping, select the schools you want to sync with School Passport. Drag the slider for individual schools or click Auto Mapping to select all. Click Next.
- In the Attributes Mapping, set the attributes for data synchronization between Infinite Campus and School Passport. Click Next. Tip: You can finish the configuration of the Infinite Campus app in this step.
- (Optional) In the Data Requirements, choose how to handle missing data attributes: Report if Missing or Skip if Missing. Click Next.
- (Optional) In the Filter Rules, set up filtering for seven entity types: student, contact, teacher, course, class, calendar, and admin. Use templates or create custom filters for more accuracy. Click Next.
- (Optional) In the Domains of Uniqueness, define unique parameters that are required to be unique to avoid duplicates. The default unique attributes are First Name, Last Name, and Email, but you can add others. See Domains of Uniqueness. Click Next.
-
(Optional) In the Master Fields, configure which attributes from different data sources will be primary to avoid data duplication. See Master Fields. Click Next.
-
(Optional) In the Sync Schedule, set how often to sync (daily or weekly), specify the time, and choose an expiration date for the sync. Click Next.
- (Optional) In the Done, click Finish to complete the setup.
- Wait a few seconds for the app configuration to apply, after which you will be redirected to the Infinite Campus application dashboard.
Sync data with Infinite Campus
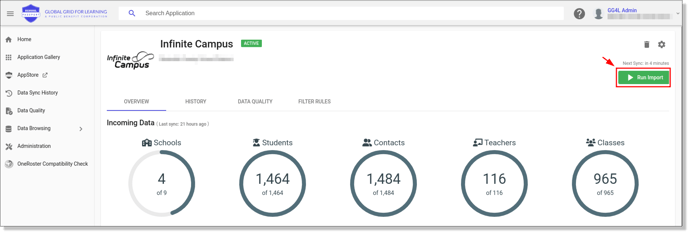
Once the Infinite Campus integration is set up, you can run a sync with Infinite Campus SIS at any time.
We recommend running a sync if you have new or updated data in Infinite Campus for School Passport. Please note, that if a teacher or student is removed from the sync, their enrollments will also be deleted.
To run a sync with Infinite Campus SIS, go to the Infinite Campus app in School Passport and click Run Sync.
If you have any questions about the Infinite Campus app configuration, please reach out to GG4L Customer Support.
See also
Grade sync with Infinite Campus
Establish a connection with Infinite Campus API 1.1 over OAuth 2.0
How can I establish a connection with Infinite Campus API 1.2 Data Source?